Best controller settings for Apex Legends
Table of Contents
Competitive battle royale titles have traditionally been dominated by PC gamers. Over the years, many of the biggest titles have made the move over to console or been created with consoles as the intended platform. With this, a whole variety of different players have started competing with a controller in hand instead of the keyboard and mouse used by so many.
Players competing on PC against those who dominate the platform with a controller are generally going to be at a disadvantage. But with a few tweaks and following some tips, it’s absolutely possible to challenge and defeat opponents no matter their setup.
In a competitive battle royale like Apex Legends, there are always going to be a variety of factors that influence a player’s skill level. While equipment and playtime are both important, other steps can be taken to ensure that you’re competing at your full potential. One of these is your controller setup.
Here are the best controller settings for most Apex players today. While some controllers offer bonus features, such as paddles, and there are different controller techniques, like claw, we’re going to be focusing on what works for a standard controller with a regular technique.
Button layout
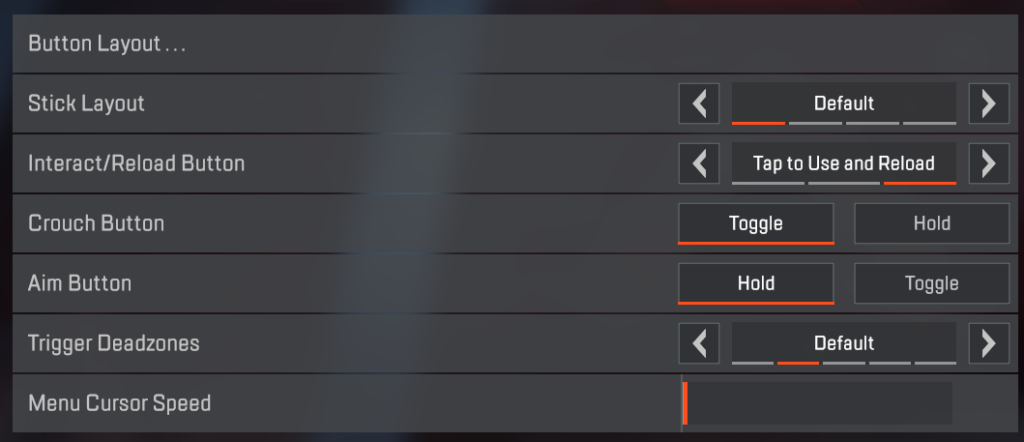
The best available button layout for users with a regular controller is Bumper Jumper. This rebinds the jump button from A/X to the front left bumper, allowing players to jump without removing their thumb from the joystick. This will assist you with checking your surroundings while jumping, something that just isn’t possible with the regular button layout.
While it does come down to preference, you might want to consider putting crouch on a toggle. This will allow you to be sure that you aren’t required to take your thumb off the joystick to remain crouched and are able to look around freely while in the crouched position.
Your aim button should be set to hold. Having this on hold allows you to immediately react to nearby enemies who are outside your ADS view.
Trigger dead zones are something most people aren’t going to want to set. You only need to adjust this if you’re having an issue with your controller moving itself in a certain direction.
Menu cursor speed isn’t that important, so feel free to leave that how it is.
Movement and aiming
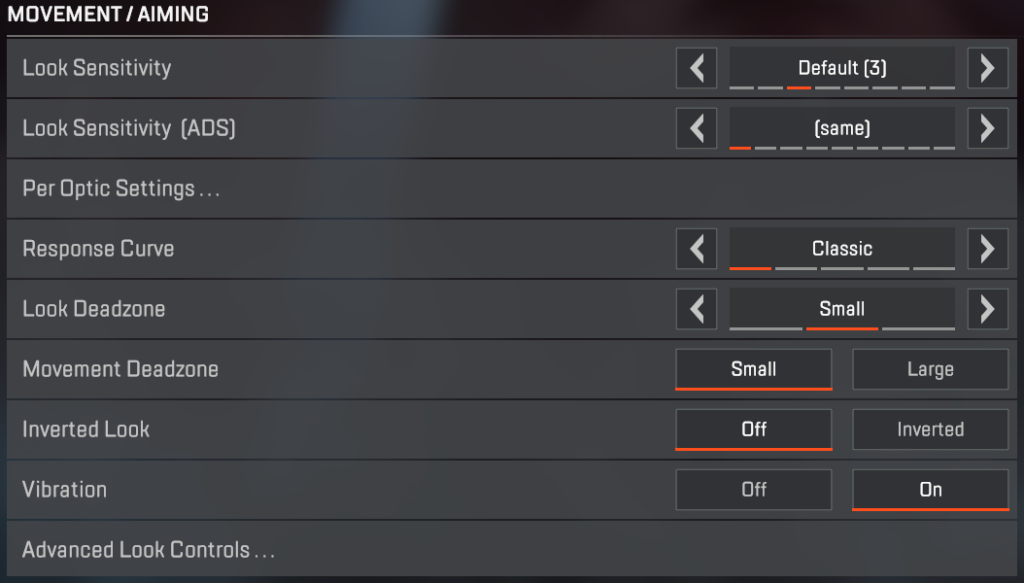
These settings are only going to be relevant for those who chose not to use the Advanced Look Controls (ALC) that will be detailed in the next section.
Regular sensitivity is going to be the most comfortable setting for a majority of players. By playing the game, you’ll discover what’s comfortable for your playstyle. You should try to have your sensitivity at the highest point that you can effectively control.
ADS sensitivity is similar. Regular is going to be the one most players chose, but you should experiment and see what you’re able to handle.
The response curve setting that’s best to choose is the classic setting. This will dictate the speed in which the game registers the movement of a player’s crosshair in response to the movements of the thumbstick.
In regard to trigger dead zones, again, you aren’t going to need to worry too much about the Look or Movements dead zones unless you have issues with your controller. Keep both on small and it should be fine.
Vibration settings come down to personal preference. Some players find them distracting and may choose to turn them off. Other players may find it helpful to feel a vibration when they’re under fire.
Advanced Look Controls
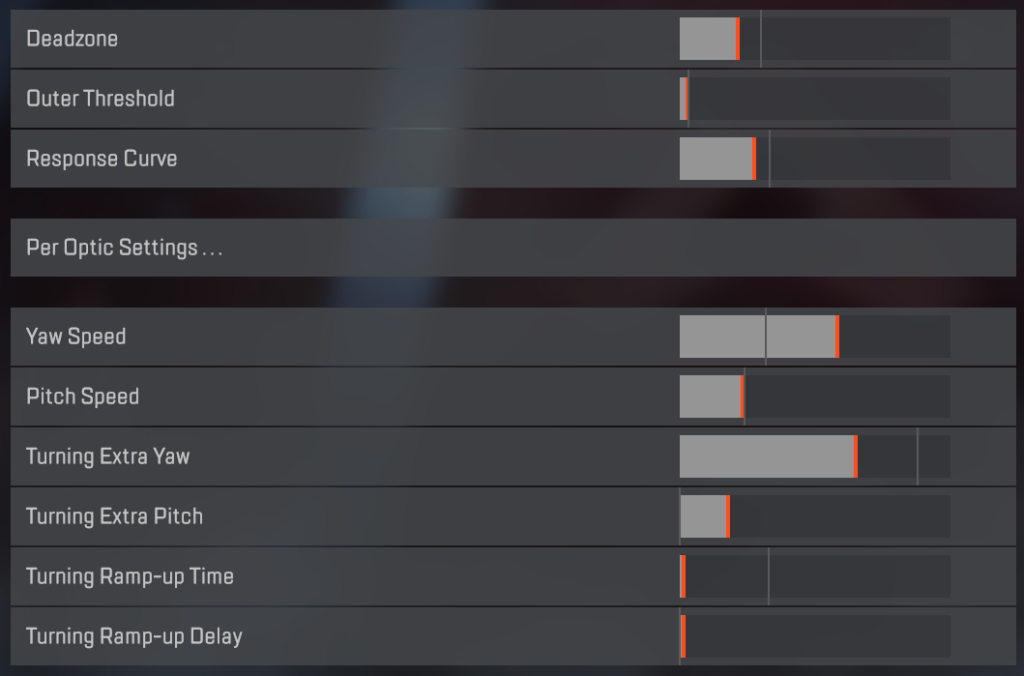
Keeping the dead zone to a minimum is going to be important since most players won’t be able to control it. Again, finding what’s comfortable for your playing style is most important, but a good place to start is around 15 percent.
This rule also applies to the Outer Threshold and Response Curve, however. You’ll want to have the Outer Threshold tuned right down to about five percent of the bar.
The two most important parts of Advanced Look Controls are the Yaw Speed and Pitch Speed. The Yaw Speed dictates how fast you turn to the left or right when you aren’t aiming down sight. Again, find what’s comfortable for you, but you’re going to want to have it as high as possible.
Pitch Speed is the opposite. This is the speed at which a player will look up and down when they aren’t aiming down sight. You’re going to want this somewhere around the middle since you aren’t going to need to flick toward the sky too often.
The following two sliders, Turning extra Yaw and Turning extra Pitch are going to be set very similar to the two mentioned above.
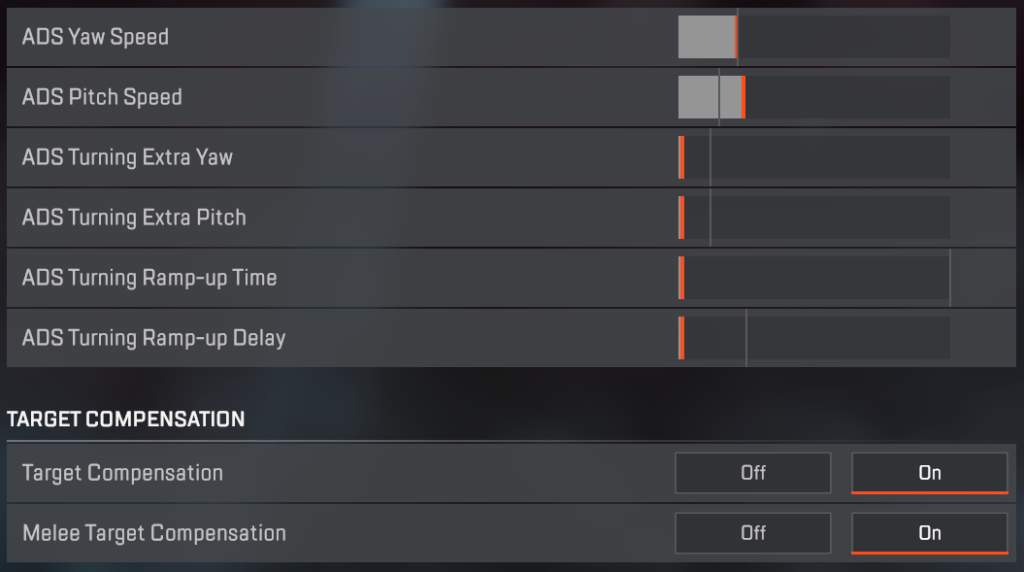
ADS Yaw Speed is going to be drastically different to the Yaw speed mentioned before. While aiming down sight, you aren’t going to want to turn to much, so look to keep it below 25 percent of the slider.
ADS Pitch Speed is another setting you won’t want to have too high. Otherwise, it won’t be controllable. Keep it around the same as the ADS Yaw Speed or maybe slightly higher.
The remaining settings in ALC can all be slid completely off since they aren’t going to be important unless you need to suit a specific style.
Target Compensation
Since the days of gaming with a controller on a PC, the argument has been whether aim assist is good or bad for the game. Despite this, you’re going to want to enable both Target Compensation and Melee Compensation. Without these two enabled, it can be increasingly difficult to find a target before they find you.
While there are variations of these settings made to assist different levels of players with different styles of gameplay, these are the simplest and most effective changes that can be made to assist with your improvement in the game.
ncG1vNJzZmicn6mytLzOq6usZpOkunCtz56vZqSVnLKvsNJopZ6vo2Svpr%2FTZpqopqSnvK24xKtkrJ2kqbavs9JmnaiqXZa9psSMpZygnZ6ZwA%3D%3D